

Introduction
Assuming you’ve set up your reseller hosting account and created your first client’s account. Now comes the part where your clients actually care about: getting their website live. If you are new to this, I suggest you check what reseller hosting is and come back for a better understanding.
Don’t worry, it might look technical at first, but adding a client website is actually one of the easiest things you’ll do once you understand the process.
(Very Important) Before adding a website in cPanel, you should already have:
- A hosting account created in WHM
- The client’s domain name (e.g., mybusiness.co.za)
- Nameservers pointing to your hosting
Once these are in place, you’re ready to go. Let’s go ahead and add the website step by step.
How to Add Websites in cPanel
Step 1: Log in to cPanel
- Use the login details of the cPanel you created and sent to your client.
- cPanel URL usually looks like: “domain.com/cpanel or domain.com:2083
- Enter the username and password. Alternatively, log in directly via WHM since you created the account, and are the super admin
You’ll see the cPanel dashboard once you are successfully logged in — this is where everything happens.
Step 2: Add the Client’s Domain (If Needed)
If the account was created with the main domain, you can skip this step.
But if you want to add another website, you’ll need to:
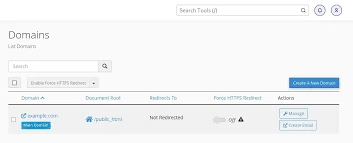
- Go to “Domains” or “Addon Domains”
- Click Add Domain
- Enter the domain name (e.g., clientsite.co.za)
This tells cPanel: “This domain belongs here.”
Step 3: Upload the Website Files
Now let’s actually add the website.
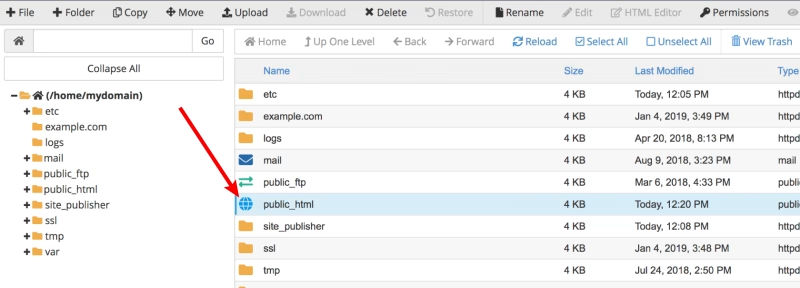
- Go to the “File Manager” section and open the folder: public_html (this is where the website lives).
- Upload files (HTML, CSS, images, etc.) or upload a zipped website with the database and extract it.
- Create a database, if it didn’t come with the uploaded files, and add it to the same folder with the web files (public_html). Navigate to phpMyAdmin or the MySQL database section of your cPanel dashboard to create the database.
Once files are in public_html, the database is connected, and the nameservers are correct, the website should begin loading.
Step 4: Install WordPress (Most Common Option)
Perhaps your client doesn’t have web files and wants to use a design template that can be customized to create a website of their own. What is now known as a content management system (CMS) and site/AI web builders are becoming widely popular. The good thing is that most of these tools are available by default in cPanel, and a popular one that most South Africans want and love to use is WordPress.
To install it:
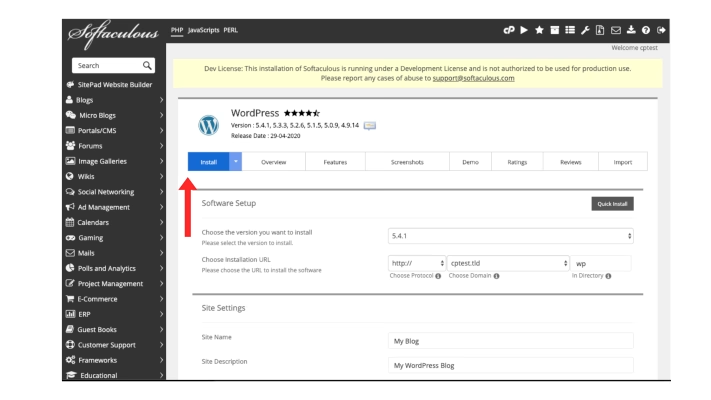
- Go to Softaculous Apps Installer in your cPanel dashboard
- Click WordPress
- Click Install
- Select the domain
- Fill in the site name, username, and password
- Click Install
Done, with WordPress installed, your client now has a working website. All you or your client has to do is log in to the admin area and customize the layout to your satisfaction.
Step 5: Create a Database (If Needed)
If you’re uploading a custom site, you may need a database.
Go to:
- MySQL Databases
- Create a database
- Create a user
- Assign the user to the database
WordPress usually handles this automatically, so no stress there.
Step 6: Install Secure Socket Layer (SSL)
SSL is what sends a secure connection between the server that stores and handles your site request and the user’s network who visits your website. This is visible by the padlock sign beside your URL at the top, and also what makes your domain have the Hypertext Transfer Protocol Secure (HTTPS)
SSL is usually auto-installed in cPanel anytime a new account is created or a new registered domain is added to that account. However, it might fail to auto-install by default, which is why you need to ensure it’s all green. To install or check if it is installed is simple; see how to install a cPanel auto SSL certificate on Websites to do it yourself, so you can be familiar with the process.
Step 7: Set Up Email Accounts (Optional)
Clients love this part — it makes their business look professional.
In your cPanel, go to:
- Email Accounts
- Click Create
- Add emails like: [email protected] or [email protected]
This adds instant value to your hosting service.
Step 8: Check the Website
Before you tell your client everything is ready, do a quick check:
- Visit the domain in your browser
- Make sure the site loads properly
- Ensure the site is secured.
Always test first, as it saves you from “it’s not working” messages later
Step 9: Send Client Access Details
Now wrap things up professionally.
Send your client:
- Website link
- cPanel login details
- WordPress login (if installed)
- Email setup instructions
- Your support contact
It doesn’t matter if your first website setup takes time — that’s normal. I assure you, after a few setups, you’ll be doing this in minutes, since it has now become part of your routine.
Some Common Mistakes to Avoid
- Uploading files outside public_html
- Forgetting to point the domain to your nameservers
- Not installing SSL (HTTPS)
- Sending incomplete or wrong login details to clients
Keeping things clean and organized will make your life easier, trust me.
Conclusion
Adding client websites in cPanel might seem technical at first, but it’s actually a simple, repeatable process, as you have seen.
Once you understand the basics — domains, files, and setup — you can confidently manage multiple client websites and grow your hosting business.
Start small, keep practicing, and before long, you’ll be a pro.
Start Adding Client Websites Today
You already have the tools and the knowledge; now it’s about using them. If you don’t have a reseller hosting yet or you wish to switch things up (experiencing challenges with your current provider), telaHosting has you covered. Compare and see for yourself. PS: We offer free migration
👉 Explore our Reseller Hosting Plans
👉 Need help setting things up? Contact us