

Changing your domain nameservers is one of the most important steps when connecting your domain name to a new hosting provider or moving your website to a different server. If your nameservers are not set correctly, your website may not load properly, your email may stop working, or visitors may still be directed to your old hosting account.
Domain nameservers act like the internet’s directory. They tell browsers and devices where your website and other domain services are hosted. When you update your nameservers, you are telling the internet where your domain should now point.
In this guide, you will learn how to change domain nameservers, what to do before updating them, how to use telaHosting nameservers for both cPanel and DirectAdmin hosting, and how to update nameservers at popular registrars such as GoDaddy, Namecheap, and Google Domains. You will also learn how to reduce downtime, protect your email settings, and avoid common DNS mistakes.
If you are new to this topic, you may also want to read our guide on how nameservers work to understand the basics before making changes.
What Does It Mean to Change Domain Nameservers?
Changing nameservers means replacing your current domain nameservers with a new set provided by your hosting company or DNS provider. This tells your domain to stop using the previous DNS environment and start using the new one.
For example, if your domain was previously pointing to another hosting provider, but you now want to host your website with telaHosting, you would update the domain to use telaHosting’s nameservers.
Once the nameservers are updated, the domain begins pointing to the new hosting platform after DNS propagation is completed.
When Should You Update Your Domain Nameservers?
You may need to change your nameservers in any of these situations:
- You have purchased a new hosting plan and want your domain to point to it.
- You are moving your website from one hosting provider to another.
- You registered your domain with one company and bought hosting from another.
- You want a different provider to manage your DNS records.
- You are setting up a new website for the first time.
If your current hosting and DNS are already working correctly and nothing is changing, then you may not need to update your nameservers.
Step-by-Step Process for Updating Domain Nameservers
Here is the standard process to follow when changing your domain nameservers:
- Identify your new nameservers.
Your hosting provider will supply the correct nameservers. For example, telaHosting providesdns1.tela-host.comanddns2.tela-host.comfor cPanel hosting, orda1.tela-host.comandda2.tela-host.comfor DirectAdmin hosting. - Log in to your domain registrar account.
Access the platform where your domain name is registered. - Locate the nameserver settings.
Look for options such as Nameservers, DNS Management, Domain Settings, or Manage DNS. - Replace the current nameservers.
Remove the old nameservers and enter the new ones provided by your host. - Save the changes.
Once saved, your registrar will begin applying the update. - Allow time for DNS propagation.
Nameserver changes may take up to 24 to 48 hours to fully propagate worldwide. - Confirm the update.
After some time, use a DNS lookup tool or WHOIS checker to verify that the new nameservers are active.
telaHosting Nameservers for cPanel and DirectAdmin
At telaHosting, the nameservers you use depend on the hosting panel attached to your account.
- For cPanel hosting:
dns1.tela-host.comanddns2.tela-host.com - For DirectAdmin hosting:
da1.tela-host.comandda2.tela-host.com
You can usually find these nameservers in your hosting welcome email after your hosting account is created. If you are not sure which ones apply to your hosting plan, check your hosting details inside your telaHosting client area or contact support for confirmation.
Important Things to Check Before Updating Nameservers
Before changing nameservers, it is important to review your current DNS setup. This helps you avoid service interruptions, especially for email or subdomains.
1. Back Up Important DNS Records
If your old nameservers are currently managing your DNS records, be sure to take note of important entries such as:
- MX records for email
- A records for website and subdomains
- TXT records for verification and email authentication
- CNAME records for aliases and connected services
If you do not recreate these records at the new provider when necessary, some services may stop working.
2. Check Your Email Configuration
If your domain is connected to Google Workspace, Microsoft 365, Zoho Mail, cPanel email, or any other business email platform, make sure the new DNS zone will include the correct MX records and related email settings. Otherwise, your website may work while your email fails.
3. Update During Low Traffic Periods
Because DNS propagation can cause temporary inconsistency, it is usually better to update nameservers when your website has lower traffic. This helps reduce the impact on visitors during the transition.
4. Confirm the Correct Nameservers
Always confirm that you are using the exact nameservers provided by your new hosting company. Entering even one letter incorrectly can prevent your domain from resolving properly.
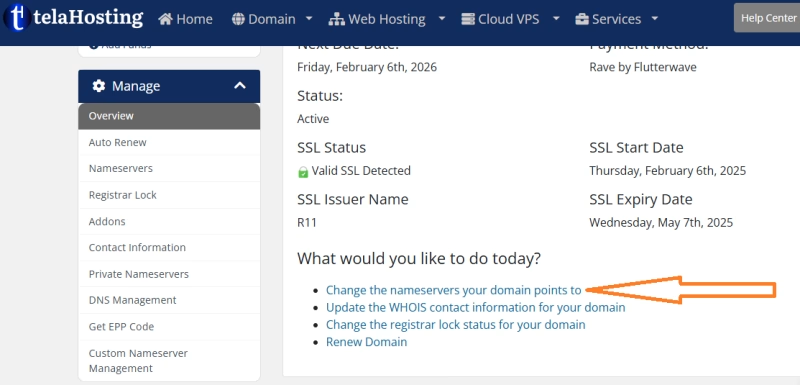
How to Update Nameservers if Your Domain Is Registered with telaHosting
If your domain name is registered directly with telaHosting, the process is straightforward.
- Log in to your telaHosting client area.
Visit your telaHosting account. - Go to the Domains section.
Find the domain you want to update and open its management page. - Locate the nameserver management option.
You may see an option such as Change the nameservers your domain points to or Manage Nameservers. - Enter the correct nameservers.
For cPanel hosting, use:
dns1.tela-host.com
dns2.tela-host.com
For DirectAdmin hosting, use:
da1.tela-host.com
da2.tela-host.com - Save the changes.
Click the button to apply or change the nameservers. - Wait for propagation.
Updates may take up to 24 to 48 hours to fully reflect across the internet.
How to Change Nameservers at Other Popular Registrars
If your domain is registered somewhere else, you can still point it to telaHosting by updating the nameservers at your registrar.
How to Change Nameservers in GoDaddy
- Log in to your GoDaddy account.
- Go to My Products.
- Locate your domain name and click Manage.
- Open Additional Settings and choose Manage DNS.
- In the Nameservers section, click Change.
- Select Custom.
- Enter your new nameservers, such as
dns1.tela-host.comanddns2.tela-host.com. - Save the changes and allow time for propagation.
How to Change Nameservers in Namecheap
- Sign in to your Namecheap account.
- Go to the Domain List.
- Click Manage next to the domain.
- Find the Nameservers section.
- Select Custom DNS.
- Enter the new nameservers, such as
da1.tela-host.comandda2.tela-host.comfor DirectAdmin hosting. - Save your changes.
How to Change Nameservers in Google Domains
If your domain is still managed through Google Domains interfaces or migrated systems that preserve similar settings, the process is generally similar:
- Log in and select your domain.
- Open the DNS tab.
- Find the section for Name servers.
- Select the option to use custom name servers.
- Enter the new nameservers and save.
Using Cloudflare with Your Domain
If your domain uses Cloudflare for DNS or proxy services, note that Cloudflare normally requires you to use the nameservers it assigns to your domain. In that setup, you do not point the domain directly to telaHosting nameservers. Instead, you keep Cloudflare’s nameservers active and then update the DNS records inside Cloudflare to point to your telaHosting hosting account.
If you want to stop using Cloudflare DNS entirely, you would update the domain at your registrar and replace the Cloudflare nameservers with your hosting provider’s nameservers.
Scenario: Your Domain Is with One Provider and Your Hosting Is with Another
This is a very common setup.
For example, you may register a domain at Namecheap but buy your hosting from telaHosting. In that case, your domain remains at Namecheap, but you update the nameservers there so the domain points to telaHosting.
Here is how it works:
- Get the correct nameservers from telaHosting.
- Log in to the registrar where your domain is registered.
- Locate the nameserver settings.
- Replace the old nameservers with the telaHosting nameservers.
- Save and wait for DNS propagation.
Once propagation is complete, your domain will begin using the new hosting environment.
Alternative Method: Pointing a Domain with A Records Instead of Changing Nameservers
In some situations, you may prefer not to change nameservers at all. Instead, you can edit the A record to point the domain to your hosting server’s IP address.
This method is useful if you want to keep DNS management with your current provider but still point your website to another host.
How It Works
- Log in to your registrar or DNS provider.
- Open the DNS records section.
- Edit the A record for the root domain (
@). - Edit the A record for
wwwif needed. - Enter the server IP address given by your hosting provider.
- Save the changes.
When This Method Makes Sense
- You want to keep your existing DNS provider.
- You have advanced DNS records already set up.
- You do not want to move email or other services to another DNS zone.
Downside of Using A Records Only
This method can be more complex for beginners because you must manually manage all other DNS records yourself. If your website, email, subdomains, and verification records are all in use, changing full nameservers is often easier and cleaner.
How Long Does DNS Propagation Take?
After you change nameservers, the internet needs time to update caches across different networks and regions. This process is called DNS propagation.
In most cases, nameserver updates begin reflecting within a few hours, but full propagation can take up to 24 to 48 hours.
During this time:
- Some visitors may see the new website.
- Others may still see the old one.
- Email or DNS-related services may behave inconsistently for a short period.
This is normal and usually temporary.
How to Check Whether the New Nameservers Are Active
After making changes, it is a good idea to verify them.
You can check your nameservers using:
- A WHOIS lookup tool
- A DNS propagation checker such as dnschecker.org
- The
nslookupcommand on your computer - The
digcommand on systems that support it
If the lookup tool still shows the old nameservers, the update may still be propagating or may not have been saved correctly.
Common Problems After Updating Nameservers and How to Fix Them
Website Not Loading After Nameserver Change
- Wait longer in case propagation is still in progress.
- Clear your browser cache.
- Flush your local DNS cache.
- Verify that the nameservers were entered correctly.
- Make sure the hosting account is active and the domain is added correctly on the server.
Email Stops Working
- Check whether the correct MX records exist in the new DNS zone.
- Confirm SPF, DKIM, and other related TXT records if needed.
- Re-add any missing email settings from the old DNS setup.
Subdomains Stop Working
- Recreate subdomain DNS records if they were managed under the old provider.
- Check that the new DNS zone includes all required A, CNAME, or other records.
Changes Do Not Seem to Save
- Make sure you clicked save or apply.
- Check whether the registrar requires confirmation.
- Ensure the domain is not under a status restriction that prevents updates.
Best Practices When Updating Nameservers
- Always confirm the correct nameservers before changing anything.
- Back up your DNS records first.
- Plan changes during low-traffic periods.
- Check your email configuration before and after the update.
- Use DNS lookup tools to confirm the change.
- Keep a copy of your old settings in case you need to troubleshoot.
Frequently Asked Questions About Changing Domain Nameservers
Will changing nameservers affect my website?
Yes. Changing nameservers changes where your domain looks for DNS records. If the new DNS zone is properly configured, your website will load from the new location. If it is not configured correctly, your website may stop working until the records are fixed.
Will changing nameservers affect my email?
It can. If your email depends on DNS records such as MX, SPF, or DKIM entries, those records must exist in the new DNS zone as well.
How long does it take for nameserver changes to work?
It can start working within a few hours, but full propagation may take up to 24 to 48 hours.
Can I change nameservers myself?
Yes. In most cases, you can change nameservers yourself from your domain registrar dashboard.
What if my domain and hosting are with different providers?
That is completely fine. You simply update the nameservers at the registrar to point to the hosting provider you want to use.
Should I use nameservers or A records?
For most beginners, changing nameservers is the easier option because the hosting provider manages the DNS zone for you. Using A records is useful for more advanced setups where you want to keep DNS elsewhere.
Conclusion
Changing or updating your domain nameservers is a normal but very important part of domain and hosting management. It allows your domain name to point to the correct hosting provider, helps make your website accessible, and ensures your DNS services are connected properly.
Whether your domain is registered with telaHosting, GoDaddy, Namecheap, or another provider, the process is usually simple once you understand the correct steps. The key is to use the right nameservers, protect your DNS records, and allow enough time for propagation.
For telaHosting users, remember:
- cPanel hosting:
dns1.tela-host.comanddns2.tela-host.com - DirectAdmin hosting:
da1.tela-host.comandda2.tela-host.com
If you need help connecting your domain, moving your website, or pointing your domain to your hosting account, feel free to reach out to telaHosting support for guidance.
You can also read our related guide on how nameservers work to better understand the connection between domains, DNS, and hosting.